How to Create Burned-In Subtitles with Adobe Premiere Pro 2024
Create burned-in subtitles in Premiere Pro 2024, from adding text to exporting video. A quick, expert guide to pro subtitles.

Previously, we learned how to add subtitles to YouTube videos. We also know we can download our SRT file from YouTube instead of manually creating it in TextEdit or other apps. Sadly, some major platforms like Instagram, TikTok, and Snapchat don’t natively support traditional subtitle formats like SRT. As these platforms become increasingly vital for video marketers, ensuring your content is accessible to international audiences and those with hearing impairments is essential.
In this article, you’ll learn how to tackle this challenge by creating burned-in subtitles for your videos using Adobe Premiere Pro 2024!
What is Burned-in Subtitle?
Burned-in subtitles are text permanently embedded into a video file. These captions are always visible and cannot be turned off or removed. Therefore, burned-in subtitles can ensure your video content is accessible to everyone, regardless of their location, language, or device. Burned-in subtitles are ideal for social media where the audience doesn't have control over the playback settings.
Benefits of Burned-In Subtitle
Burned-in subtitles offer several advantages:
Text Customization: You have complete control over how the text looks. You can customize the font, size, colour, and style to align with your brand guidelines. Compatibility with All Platforms & Devices: Burned-in subtitles are compatible with all platforms and devices. This is because your subtitles are embedded in the video, so they will appear as long as your video is successfully uploaded. Protection Against Piracy: Embedded subtitles can deter unauthorized distribution by making it more difficult to remove or alter the subtitles. No Sync Issues: Burned-in subtitles eliminate the risk of synchronization issues that may occur with external subtitle files, ensuring perfect timing with the video.
Creating Burned-In Subtitles with Adobe Premiere Pro
You can create burned-in subtitles in Adobe Premiere Pro using the following three methods:
Adding Manual Subtitle
Open Adobe Premiere Pro.
Choose your project or create a new project.
Go to Window > Workspaces > Captions and Graphic.

When the text panel appears on the left side, click Captions.
Select Create new caption track > select Subtitle format > click OK

Click the (+) button next to the Search bar.

Write your caption and adjust the timestamps.

Once finished, you can export your captions into an SRT file by clicking the three horizontal dots on the top right of the Captions panel. From the dropdown menu, select Export > Export to SRT file.

To finish, click the Export menu next to the Edit menu. Name your file, adjust your preset, video format, etc. In the Captions section, remember to select Burn Captions Into Video.

When you’re done, click Export on the bottom right of the panel. Your subtitle is now burned in the video!

Uploading an Existing SRT File
- Select File > Import and Select your SRT file.

Alternatively, press Command+I or Ctrl+I on your keyboard or drag your SRT file to the media panel on the bottom left side.
Drag your SRT file from the media panel to the timeline. When the pop-up box appears, select Subtitle format > tick the Source timecode box > click OK. Your subtitles will be automatically shown on the video and in the Captions panel.

To export your video, click the Export menu next to the Edit menu. Adjust your file’s name, format, and preset, and in the Captions section, select Burn Captions into video.
Click the Export button on the bottom right of the panel. You’re done!
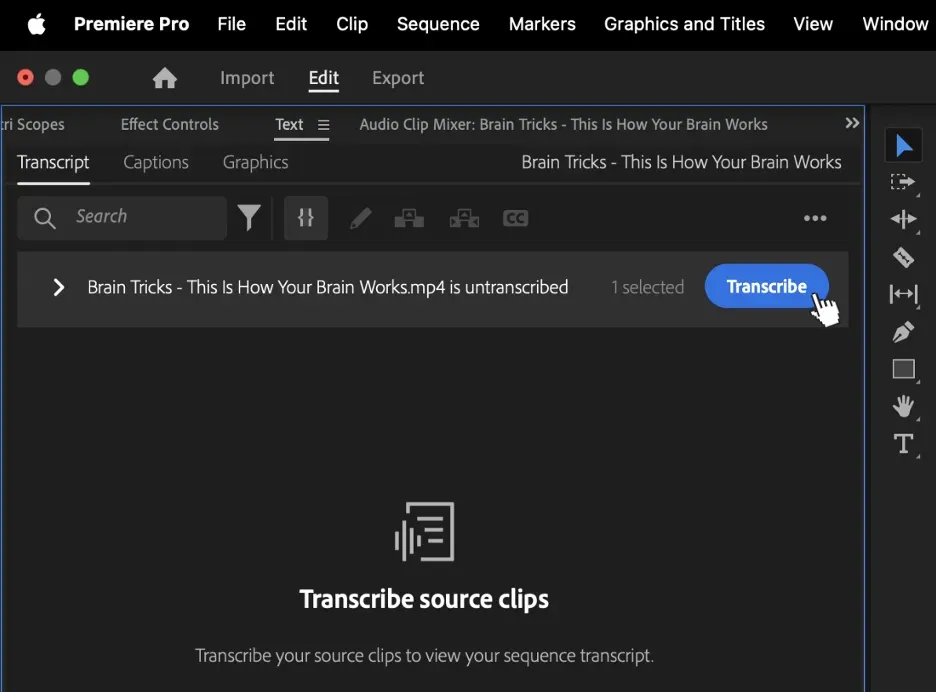
Creating Automatic Subtitles
Go to Window > Workspaces > Captions and Graphic.
If the automatic transcriber menu is available, click Transcribe and wait until the automatic transcription finishes.
When the transcription is finished, select the Create Captions button.

Customize your subtitle format and click Create Captions.

Go to the Captions panel and check whether the transcription is accurate.
You can download your subtitle by clicking the three horizontal dots on the top right of the Captions panel > Export > Export to SRT file.
Now, click the Export menu next to the Edit menu. Adjust your file’s name, format, and preset, and remember to select Burn Captions into Video in the Captions section.
Click the Export button on the bottom right of the panel. And you did it!
How to Customize Your Subtitle Appearance
To customize the appearance of your subtitles, go to Window > Essential Graphics. The panel will appear on the right side.
Ensure your subtitle style is unified. To do this, Select All your captions (press Command+A or Ctrl+A) in the Captions panel before you edit your font style, size, position, spacing, etc.
Conclusion
Now that you know the three methods to create burned-in subtitles in Adobe Premiere Pro, which one do you prefer? We believe that you—and most people—will choose the most efficient way to save time and energy.
Are you finding text translation and multilingual communication challenging? Worry no more! The VideoTranslatorAI team is developing groundbreaking tools to make your work easier. Our innovative multilingual teleconferencing tool will break down language barriers and enable smooth communication across different languages. Whether you're creating marketing materials or connecting with global audiences, we're here to help you succeed.
Curious to learn more?If you have questions, try our product now.
See you next time for more valuable information!